Sharing Your Recordings
After the recordings have been made, edited, and reviewed, they are ready to be exported or uploaded so that others can share them. You can:
Export the completed project to your tablet as a tr file
Export the completed audio to your tablet as a zip file
Export the completed audio to another application on your tablet as a zip file
Upload a project to the Box Server
Opening the Information window
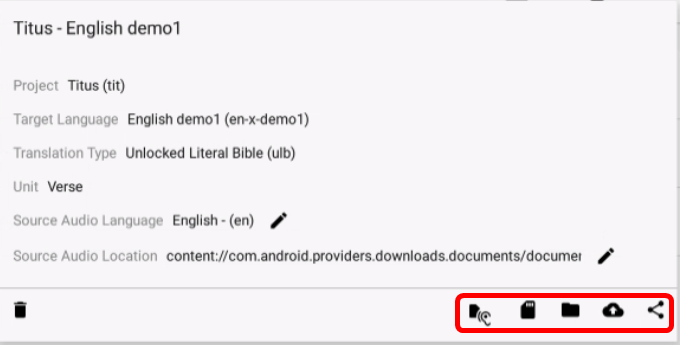
You can share your recordings from the Information window of the project. To open the Information window:
On the Project Manager screen, tap the Information icon (gray circle with an “i” in it) next to the project that you want to export or upload. (See Information icon.)
The Information window opens. The icons along the bottom right of the window enable you to share your recordings. These icons are explained in the next few paragraphs.
Export Recordings
Export to your tablet as a tr file
This action exports the project as a tr file to your tablet. You can give this file to others to import into their installation of BTT Recorder so that they can work on it, or you can use it as a source audio file for BTT Recorder.
To create a tr file on your tablet, perform the following steps:
On the Information window, tap the Source Audio icon (listening ear) to save the tr file to the tablet’s file system.
A file manager window opens to enable you to navigate to and open the folder where you want to save the tr file. You can save it anywhere in your internal storage or to your SD card. You can also rename the file before saving it if desired. NOTE: The SD Card may need to be “activated.” Follow the directions provided by the tablet on activating the SD Card so that you can save files there.
Tap SAVE to save the file. If you save it to the SD Card, you can remove the card to share the file with others.
Export to your tablet as a zip file
This action packages the individual wav files into a single zip file that you can save to your tablet. You can give this file to others or you can import it into Orature software.
On the Information window, tap either the Save icon or the Folder icon to save the project file to the tablet’s file system.
Wait while the files are processed. The program compiles a zip file containing the individual wav files for each chapter.
A file manager window opens to enable you to navigate to and open the folder where you want to save the zip file. You can save it anywhere to your SD card or in your internal storage. You can also rename the file before saving it if desired. NOTE: The SD Card may need to be “activated.” Follow the directions provided by the tablet on activating the SD Card so that you can save files there.
Tap SAVE to save the file. If you save it to the SD Card, you can remove the card to share the file with others.
Export the file to another application
To export the file and have another application immediately use it, such as in an email as an attachment, perform the following steps:
On the Information window, tap the Share icon (3 dots with lines between) to send the project file to another of the tablet’s applications.
Wait while the files are processed. The program compiles a zip file containing the individual wav files for each chapter.
A window opens to show the available applications on your tablet that you can use for sharing. Tap the one you wish to open, such as Gmail.
The chosen application opens – for example, Gmail opens a compose window with a zip file of the project audio already attached so that you can easily send it to someone.
Upload Recordings
Upload to the Box Server
This final method of sharing your recordings does not use the Information window. You must have a Box.com account on the WA Box server to be able to store files there.
In a browser on the tablet that has the BTT Recorder files, open the Box.com site (https://account.box.com/login) or the Box APP using your login and password.
To upload to Box.com, you perform the following steps: Full instructions for each step is given below.
Find and open the Language folder.
Create the folder structure for the Language.
Create chapter folders.
Upload chapter recordings to the chapter folders.
Find the Language folder for the files on Box.com or in the Box APP
Those folders that you have access to will appear on the home page of the website or the APP.
Option 1. Select the folder for target language of your project.
NOTE: You may need to look in a Region folder or a Country folder to find the Language folder.
The folders are shown under the region and/or country of the language. For example, if the target language of your project is Chickasaw, tap the Magnifying glass icon and type “Chickasaw” in the search box, and then tap Sea
Option 2. Search for the Language folder.
- In the APP.
Tap the Magnifying glass icon to search for the target language if desired.
Type in the language name or the language code.
Tap the Magnifying glass icon for search results.
Tap the desired Language folder to open it.
- On the website.
Click in the ‘Search Files and Folders’ field at the top of the window.
Type in the language name or the language code.
Press the Enter key for search results.
Click on the desired Language folder to open it.
Create the folder structure
If the folder structure for the language does not exist, you need to create it.
NOTE: You will need to have the status of of at least a ‘Viewer-Uploader’ to be able to create a folder.
Select the Plus icon in the APP or the New + button on the website.
Select Create Folder on the menu.
In the ‘Folder Name’ field and type Oral, and then select Create Folder.
In the Oral folder, create the testament folder (OT or NT).
In the testament folder, create a folder for the book of the Bible. You should name it with a leading identification number.
(See the table entitled “Global Standard Nomenclature for Books in the Bible” below for the 2-digit number and 3-letter identification of the books. For example, the 2nd New Testament book for the Spanish Bible would be 42-MRK (or 42-Markos if you use the Spanish name with the leading identification code).
Create Chapter folders – one for each chapter in the book. To create a new chapter folder:
a)In the Bible book folder, tap the Plus icon.
b)Tap Create Folder in the menu.
c)Tap in the ‘Name’ field and enter the chapter number as 2 digits, with a leading zero for single-digit numbers. (3 digits for the Psalms chapter folders. Such as: 001, 002, 010, 023, 100, 133, etc.)
d)Tap the blue Create Folder button. The new folder is created.
Repeat steps a) through d) to create a folder for each chapter.
NOTE: These steps can be completed when additional chapters are ready for uploading.
Global Standard Nomenclature for Books in the Bible
01-GEN |
11-1KI |
21-ECC |
31-OBA |
41-MAT |
51-PHP |
61-1PE |
02-EXO |
12-2KI |
22-SNG |
32-JON |
42-MRK |
52-COL |
62-2PE |
03-LEV |
13-1CH |
23-ISA |
33-MIC |
43-LUK |
53-1TH |
63-1JN |
04-NUM |
14-2CH |
24-JER |
34-NAM |
44-JHN |
54-2TH |
64-2JN |
05-DEU |
15-EZR |
25-LAM |
35-HAB |
45-ACT |
55-1TI |
65-3JN |
06-JOS |
16-NEH |
26-EZK |
36-ZEP |
46-ROM |
56-2TI |
66-JUD |
07-JDG |
17-EST |
27-DAN |
37-HAG |
47-1CO |
57-TIT |
67-REV |
08-RUT |
18-JOB |
28-HOS |
38-ZEC |
48-2CO |
58-PHM |
|
09-1SA |
19-PSA |
29-JOL |
39-MAL |
49-GAL |
59-HEB |
|
10-2SA |
20-PRO |
30-AMO |
|
50-EPH |
60-JAS |
* The number 40 is skipped
Now that you have the folders set up, you can upload your recordings to them. Translators typically upload from their tablets; however, a MAST technical support person may harvest the audio files from a tablet to a thumb drive and then use the computer to upload them. Both methods are discussed below.
Upload chapter recordings from the Box APP These instructions assume that the Box APP and the BTT Recorder files are on the same tablet.
As described above, navigate to the correct language, book and chapter folder.
Tap to open the chapter folder.
Tap the Plus icon.
Tap Upload Content on the menu.
You may need to swipe the upload window up to view.
Tap Select files to upload on the menu.
A file manager window opens.
Tap on the 3-line icon at the top left and choose to open the SD card or Internal Storage. The location of the files depends on the choices made where BTT Recorder saves the files.
On the right section:
Tap BTTRecorder.
Tap your target language code.
Tap the project type.
Tap the book code.
Tap the chapter number. The chapter folder opens and shows all the verse recordings for that chapter.
Do a long tap on one of the files (tap and hold until the file’s bar turns darker), and then tap each of the other files to select all of them
Tap OPEN at the top right of the screen.
The list of files appears in the Box window as they are uploaded. It may take some time to upload the files.
Upload chapter recordings from the computer
These steps assume that a MAST Tech Support Person, or someone working on the recordings, has harvested the files from the tablets onto a thumb drive.
In a browser on the computer that has the BTT Recorder files, open the Box.com site (https://account.box.com/login) or the Box APP using your login and password.
Follow these steps to add files to a folder onto the Box server:
Navigate to the correct Language, Book and Chapter folder.
Click the Chapter folder to open it.
Click on the New + button found at the top right.
Tap File Upload on the menu.
In the computer’s File Manager, browse to files. There are 2 ways to upload the files: * Select the desired files.
Click Open.
Wait while the files upload to Box.com.
OR
Drag the files from the File Explorer. * Select the files and click-hold-and-drag the files to the browser window. Release the mouse button when you see the word “Copy”. * Wait while the files upload to Box.com.
Repeat these steps for all audio files in each of the chapters.