Getting Started with BTT Recorder
There are 4 tasks to perform in order to start using BTT Recorder:
Create a new user (if you have not used the program before).
Create a new project (if there are no existing projects).
These tasks are described below.
Create a New User
When BTT Recorder first opens, it displays the Available Users. If you have already created a user, tap the card that shows your identicon.
To create a new User profile
Tap the New User card.
Read, or have someone read to you, the three Terms of Use.
Tap each of the green bars.
Read the content. You may need to scroll to see the entire contents of the ‘Translation Guidelines’.
Tap Close at the bottom of each of the windows.
Tap I AGREE at the bottom of the window if you agree with all three statements.
Tap the Microphone icon and record your name or pseudonym. A pseudonym is a false name that you can use if you are concerned that being associated with Bible translation will compromise your safety or that of your family.
Record your name while the red circle is going around – 3 seconds.
Note the image in the center of the window. This is your identicon. Each user has a unique identicon. If you need to log into BTT Recorder again, you can tap the card with this identicon on the Available Users page.
Press the play button to listen to the recording.
If you can you hear your voice and understand your words, then tap Yes.
If your voice is too soft or you cannot understand your words, then tap Redo to make another recording.
When you accept the recording, the initial screen (home screen) opens and you are ready to get started.
NOTE: If you want to create another user, you can log out of the program (see Using the Options Menu)
Create a New Project
If you have no existing projects, you will need to create a project before you can work in BTT Recorder to perform oral translation.
You can start creating a new project by one of the following methods:
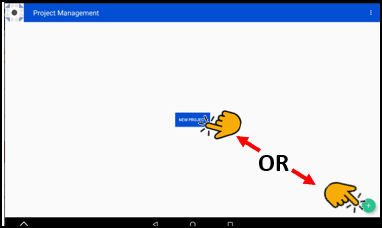
If no project is shown in the right blue section of the Home screen, by tapping the right area (recording section) on the Home screen
From the Project Management screen, by tapping the New Project button (seen only on a new install) or the Plus icon. (You can get to the Project Management screen from the Home screen by tapping in the left green area.)
Once you have initiated the project, the steps to define it are the same:
Select a target language
Select the project type
Select the mode of the recording
Optionally select a source audio
NOTE: During these next steps, you may tap the back arrow in the top blue bar to go back to the previous screen at any time. You may want to go to the previous screen to make a different choice.
Step 1: Select a Target Language
The Target Language is the language into which you will translate.
You can search for your desired language by one of the following methods:
Swiping from the bottom of the screen up to scroll through the languages.
OR
Tapping the Magnifying glass. The keyboard appears.
Type in the language or language code. Close the keyboard by tapping the down arrow icon, or back arrow icon.
Tap the name of the desired Target Language. The program advances to the next step.
Step 2: Select a Project Type
The Project type defines what you will be translating from and consists of:
What kind of project? Tap to select from the choices of Bible: Old Testament, Bible: New Testament, or Open Bible Stories.
Which book or story? Tap a book in the Bible or a Bible story to translate. Swipe up to see more book or story names.
If you are translating the Bible, which translation type? If you are translating from the UDB or ULB, tap one of those choices. Otherwise, tap REG: Regular.
Note: This choice does not apply to Open Bible Stories.
Step 3: Select the Recording Mode
Note: This choice does not apply to Open Bible Stories.
This defines whether you will record a verse at a time or a chunk at a time. In most cases, you should record in verse mode.
Verse mode has each recording separated like a regular Bible, one verse at a time.
Chunk mode has each recording separated according to groups of verses.
Important: If you are using source audio, the mode that you select should match that of the source audio.
Step 4: Select the Source Audio (optional)
If you do not have source audio available, tap SKIP in the lower right corner of the screen.
If you do have source audio, you must specify the language and the location of the audio file.
Select the source audio language
Tap the top green bar (SELECT SOURCE LANGUAGE) to select the language. The Source Language is the language from which you will translate.
You can search for the desired source language by:
Swiping from the bottom of the screen up to scroll through the languages.
OR
Tapping the magnifying glass at the top right of the screen. The keyboard appears. Type in the language or language code.
You can close the keyboard by tapping your tablet’s down arrow icon or back arrow icon.
Tap the name of the Source Language. This must match the language of the source audio file. The program goes back to the Source Audio window.
Select the source audio file
NOTE: The audio files are named as follows: [Language]_[type]_[3-letterbookcode].tr. So, for the ULB audio of the book of Titus in English the file would be named en_ulb_tit.tr.
Tap the bottom green bar (SELECT SOURCE LOCATION) to load the source audio.
The file manager should open to the directory that is set as the default location for source audio.
If your source audio is not in that directory, you can navigate to the folder where the audio files are located.
HINT: You may need to search in the Internal Storage for *.tr files.
Tap the desired source audio file.
The program returns to the Source Audio window and displays the location of the source audio file on the lower green bar.
Confirm that the information in the green bar is correct, and then tap CONTINUE at the bottom right of the screen.
The Recording screen opens. You are now ready to record. Go to Recording screen for instructions on how to record.